Servicing Platter System Requires That You Know What You're Doing
By WESLEY TROUT
Throughout this series of articles on various makes of film transport systems, we have endeavored to present helpful and interesting data which would be of use to those exhibitors already using the systems and also to those who might be considering the purchase of one. The platter system has become Suite popular, providing good service so long as it is operated properly and conscientiously taken care of. All systems are simple to operate, provided they are understood thoroughly by the projectionist or exhibitor.
There are mechanical and electrical types of platter systems on the market today, these two adjectives referring to the method that is used to drive the platter and feed the film to the projector automatically. The platter equipment is the brain of the system and must work perfectly at all times. Each make has its own special features and our data serve only as guide lines for the exhibitor who contemplates buying this type of equipment. Select one that is manufactured by a reputable company which will back up its guarantee. There are several leading manufacturers that advertise in this publication. We are sure you can depend on them to give you the facts about their equipment.
Read Instructions
As we have pointed out in previous articles, the projector mechanism must be kept in tip-top running condition if it is to work perfectly with your film transport equipment. Sprockets in the projector should be checked occasionally for worn teeth or worn film gate shoes. Worn sprockets can cause film damage, which can cause film not to run smoothly through the mechanism. Unnecessary stops in the program very often result.
Film must be checked carefully for bad splices and torn sprocket holes. It must be inspected before it is loaded on the platters in order to avoid film breaks during the program. Most troubles we have found were due to poorly inspected film and improper threading of equipment.
New,
improved splicers have been marketed
which enable repairs to be made without removing film frames, thus
providing improved print conditions. The platter type of film transport
systems does provide a smooth method of film handling without
rewinding. We would say the selection should depend on the one that is
easiest to operate, simplest to maintain and dependable.
Clean Rollers Regularly
If film jumps out of roller, it probably is due to the roller not being properly aligned for the path of the film. There are adjustments for proper alignment of rollers on all makes of film transport systems. Check your instruction manual for details on roller alignment.
Once the projector and film transport system is threaded up, no further attention will be necessary until time to rethread. However, it is wise to check the equipment and picture frequently to see that everything is running okay.
By the way, what originally began as a makeup table for platter film transport systems is really a transfer and makeup table for splicing the reels together and transferring the film onto the platters for presentation. They should be placed as close as possible to the platters in order to make it easier to mount the film. Manufacturers have designed a makeup table that is efficient and handy to operate for any projectionist. To repeat, it is essential that the film be inspected carefully before loading onto the platter as it is difficult, although not impossible, to repair the film at a late date. Do the job right at the outset and save time and avoid film breakage is our advice.
We
herewith present some interesting and
helpful data on the Simplex Aero Matic (SAM 2000), distributed by
National Theatre Supply Co. It is a no rewind film transport system,
more commonly referred to as a platter transport film system. According
to the company, it has been specifically designed to eliminate
complicated control system. Why is SAM virtually trouble free? Answer,
because of its use of air for propulsion and control. The principal of
the operation is very simple and is as follows: The vertical post and
the three horizontal support arms for the platters are supplied with 6
to 8 pounds of pressure by a quiet, continuous-duty blower. This air is
fed by a simple film-controlled butterfly valve to the turbine (air
motor) which drives whatever platter the film is being pulled from.
More feed speed required—more air, less speed—less air. This servo
action is gentle and has a very sensitive "long period" of recovery.
There is no "Mad-Hatter" on-off response with subsequent film stress.
It is actually possible to stop the feed platter completely for an
extended time, such as might occur with a sticky patch, with complete
gentle recovery.
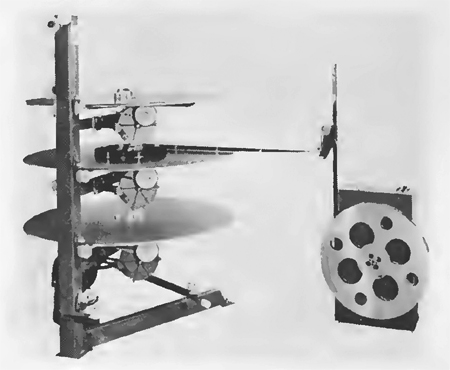
Simplex Aero Matic (SAM 2,000)
The Simplex Aero Matic system has its own close down, fail-safe protection and provides "logic voltage" to operate the PEC series of projector control safety devices and automation systems.
We want to stress the importance of perfect alignment of platter systems. Keep in mind before the platter can be completely aligned, the projector must be in its final position. This advice applies to the installation of platter equipment. Also keep in mind to make a check on this from time to time. A point which is frequently missed in platter installations, we find, is the importance of "even" film alignment as it passes from roller to roller. Tension should be equal on both sides of the film at all roller junctions. Because of the low tension on the film in a platter system, it will run even when the alignment is not correct, but eventually film breakage and damage will occur. So, when this happens, the blame is placed on a platter malfunction rather than on the real culprit—bad alignment. You should check the rollers to make sure they are turning freely and that the alignment is perfect for smooth film travel. Do this to avoid film damage and unnecessary stops.
To operate the equipment with film, locate the makeup table adjacent to the platter. Now place one of the takeup rings on the center platter, insert the "drop pins" through the holes provided and throw the locking levers to the down position. Next, place the first reel of film on the makeup table spindle (sound track up). Feed in to the center platter and insert the end into the slot in the takeup ring. Next, you perform the following steps:
(a) Place center platter feed control arm to full "on" position.
(b) Place other two feed control arms in full "off" position.
(c) Be sure the lower takeup control arm is unlocked and in full "off" position (away from vertical post).
(d) Throw makeup switch "on."
Now film should start to takeup on the center platter. Of course, takeup speed may be increased if desired by placing direction control switch on makeup table to forward position and speed adjustment knob advanced until inertia of the film reel is overcome. As the reel nears its end, speed may be reduced by reversing this procedure. The platter may be stopped for splicing or inspection of film by disengaging the turbine drive wheel release lever, or stopping the blower. On subsequent reels the same operation is followed until the entire program is on the center platter. When completed, turn off makeup switch. It is easy to operate a platter system when you have the knowledge of how it works.
Here is film threading and operation of the Simplex Aero Matic (SAM 2,000):
(1) Remove the takeup ring from the center platter by lifting the two locking levers (which will decrease the ring size) and remove the ring by pulling up on the drop pins.
(2) The drive wheel release levers on the turbines must be engaged (up) on the takeup and feed platters.
(3) Have all of the carburetor control arms in "off" position.
(4) Swing the lower takeup control arm toward the vertical post and lock it into its forward position with its locking lever. The blower should now run.
(5) Thread up the system as per manufacturer's diagram. Always leave sufficient slack at the end of threading to allow several laps around the takeup ring.
(6) Move takeup platter control arm to full "on" position. This will apply tension to this platter.
(7) Move feed platter control arm to floating position.
(8) The projector should now run until start mark is reached. During this process, the lower tension arm lock will drop away, allowing the arm to float. Note: Do not repeatedly "inch" the projector as this will build up undue film tension.
If you plan on installing the Simplex platter system, the successful operation of platter equipment depends on the proper location of the platter in relation to the projector. If the projection room space is limited, SAM can be located in an adjoin-ing room, and the Simplex G-5552 roller arm assemblies can be used to guide the film to and from the projector. The rule of thumb is one roller for every ten feet of film travel. The number must be increased when a change of direction or elevation is required. These roller assemblies are malleable and should be bent to give the correct film path.
Setting Up SAM Unit
The next step is important for it will show that the setup has been correct, and that shipping or handling has not thrown the factory alignment out. Place three pieces of tape, each about 4 inches in length, one on each platter pointing toward the center of the platter (radially).
Now turn the makeup switch on, and on the first revolution note the slowest platter and count approximately ten revolutions. During this period if the slower platter is passed by one of the other platters, the fastest platter must be slowed down, of course. This is accomplished by simply covering one or more of the turbine air outlet holes. (The minimum rpm of any platter should be 58). It is important you should keep this in mind and check occasionally.
Here is some general information you should be familiar with about the SAM platter system.
(1) Film must go around the takeup roller before the first swivel.
(2) The sound track is toward the post at the first swivel and up on the platter.
(3)
The takeup arm (door check arm)
should be in the "off" position and the switch on the right leg should
be in the
"on" position for maximum makeup speed.
(4) The switch on the leg must be in the "off" position when running the show. The fail-safe will not operate if switch is not in the correct position.
(5) Note carefully: When taking down a show the lever on the turbine must be in the "down" position (disengaged). If the lever is not in the correct position, the film will be pulled too hard. After take-down, the lever must be returned to the "up" position in order to run the platter.
(6) Makeup and takedown can be performed while running a show. In this instance the fail-safe switch is left in the "on" position. Now, for makeup, power on and off is controlled automatically by the guide arm assembly at the "brain." Wait 15 minutes after the start of the show.
If the rollers become noisy, it indicates they are dry and will need a few drops of projector oil. Add oil to the shaft on both sides of the rollers, and use a clean rag and wipe off any surplus oil so it won't run down on the film.
If you ever have trouble with film jumping out of the rollers, you will find this trouble due to the rollers not being properly aligned for the path of the film. Keep rollers free of any dust or dirt accumulation by cleaning them frequently.
It is of the utmost importance that a film transport system using platters should be carefully leveled and aligned for smooth travel of film off the platters into the projector. You can use a regular three-foot or longer level for this work. Adjust leveling screws on the base as needed to make platters perfectly level.
Keep film clean and free of static by preventing it from falling onto the floor or carpet while you are assembling your program.
Inspect Film Closely
Note: When you get ready to start the show (projector), be sure to watch both the feed and takeup platters and see that they are turning okay and that the film is tracking perfectly before you leave the projector.
We want to stress the importance of proper maintenance of any make of platter system is to keep the payout control mechanism parts clean and free of dust as this will assure better performance from your equipment. Do not use a chemical cleaner. Clean the assemblies with a clean, lintless cloth several times a day. You can use a small vacuum cleaner or hand bellows for blowing out dirt in places hard to reach and then finish with a clean cloth.
We know that all manufacturers of film transport equipment have paid particular attention to keeping their film transport equipment maintenance to an absolute minimum. In order to further increase the life of equipment and have it run smoothly, most manufacturers use permanently lubricated and sealed in bearings. Lubricate only the parts instructed by the manufacturer and wipe off any excess oil. Sealed-in lubrication of bearings assures longer wear and no moving shaft or part will be neglected for the want of sufficient lubrication.
Keep this in mind: All film transport systems work hand-in-hand with your projector. Therefore, it is important that you keep your projector mechanism in good repair at all times. Frequently check the sprockets, gears, tension shoes, lateral guide rollers and intermittent movement for wear. Make sure the mechanism is properly adjusted so that the film will go through it in a straight line down thru to the sound head. Make sure sound head and mechanism is in line with each other. Film must travel straight down through the sound head and out again in order to have good sound reproduction. Occasionally check the bolts or screws that hold the mechanism onto the sound head for tightness.
Sound head and projector mechanism sprockets must be cleaned every day with a stiff-bristle tooth brush. Dirt build up on the sprockets can cause the film to run off and then you are in trouble. It takes only a few minutes each day to clean sprockets and projector.
Always keep a set of extra sprockets, tension shoes and idle rollers on hand for emergency and you will have spare parts when needed.
If you will follow our instructions, and the manufacturer on operating or installing film transport equipment, you should not have any trouble and you will avoid sudden breakdowns or film damage. Study these instructions and give your patrons the best in screen presentation.
April 19, 1976